

Want to change name after marriage, divorce, or another legal reason, but aren’t sure where to begin with updating? While changing your name may sound like a simple process, it often involves updating multiple official documents, and your PAN card should be one of the first because without it, you face many issues such as income tax filing, KYC verification, banking, investments, and other financial services.
So in this complete 2026 guide, you’ll learn who can apply, the documents required for different types of name changes, how to Change Name on PAN Card online or offline, applicable fees, processing time, common reasons for rejection, and practical tips to help you update your PAN card without unnecessary delays.
Why Is It Important to Update Your Name on Your PAN Card?
PAN card plays an important role because all your financial activity is linked with it. To keep your financial records accurate and consistent across different government departments and financial institutions, it is mandatory to update your details.
If you don’t update your details and does not match your Aadhaar, passport, bank account, or other official documents, you may experience delays in identity verification and other financial services.
For example, if you change your surname after marriage or change it back after divorce, your PAN card should also be updated to match your current legal name.
Here are some of the reasons to Update name on the PAN card
- Don’t delay KYC verification.
- Easily process your Income Tax Return (ITR) filing and get a faster tax refund.
- Keeps your Aadhaar, passport, bank account, and PAN records consistent.
- Reduces delays while opening bank accounts or applying for loans and credit cards.
- Makes mutual fund, stock market, and other investment transactions easier.
- Helps financial institutions verify your identity without additional documentation.
Important: Updating your name on your PAN card does not change your PAN number. Your existing PAN remains the same, and only the name associated with it is updated after successful verification.
What Can Happen If You Don’t Update Your PAN Name?
If your PAN card still shows your old name after marriage, divorce, or a legal name change, you may face:
| Document Category | Accepted Documents (Any One) |
|---|---|
| Proof of Identity (POI) | Aadhaar Card, Voter ID Card, Driving License, Passport, Ration card having photograph of the applicant. |
| Proof of Address (POA) | Aadhaar Card, Voter ID Card, Driving License, Passport, Latest utility bill (not more than 3 months old), Bank account statement (not more than 3 months old). |
| Proof of Date of Birth (PODB) | Birth Certificate, Aadhaar Card, Passport, Driving License, Matriculation Certificate. |
| Proof of PAN | Copy of your existing PAN card. If unavailable, an FIR copy might be required. |
| Proof of Name Change (Important) |
|
A quick tip: Before you start, ensure your Aadhaar card is already updated with your new name. Linking your PAN and Aadhaar is mandatory, and the name must match on both documents for the change to be processed successfully.
How to Change Name on PAN Card Online: A Step-by-Step Guide
There are two portals on which you can easily update your name, i.e NSDL e-Gov portal or the UTIITSL portal.
Note: We implement all these in real.
Change Name on PAN Card Online via NSDL e-Gov portal
Step 1:- Visit the Official Website:
https://tinpan.proteantech.in/ or direct by visiting the link.
https://onlineservices.proteantech.in/paam/endUserRegisterContact.html
Step 2: Select the Application Type and Applicant Category
On the application page, you’ll need to choose the appropriate options before filling out the form.
- Under Select PAN Application Type, choose “Changes or Correction in Existing PAN Data / Reprint of PAN Card”.
- Under Select Applicant Category, select “INDIVIDUAL” if you’re updating your personal PAN card.
Once you’ve selected these options, click Continue or proceed to the next section to start your PAN name change application.

Step 3: Enter Your Personal Details
Now, fill in the required information exactly as requested on the application form.
Enter the following details:
- First Name, Middle Name (if applicable), and Last Name/Surname
- Date of Birth (DD/MM/YYYY format)
- Email ID
- Mobile Number
- Select whether you are a Citizen of India (Yes/No)
- Enter your existing PAN Number
After filling in all the details, tick the declaration/consent checkbox at the bottom of the page and click Submit to continue with your PAN name change application.
Tip: Make sure your name, date of birth, and PAN number match your existing PAN records. Any incorrect information may delay the verification process or lead to rejection of your application.
Step 4: Complete Your Personal Details
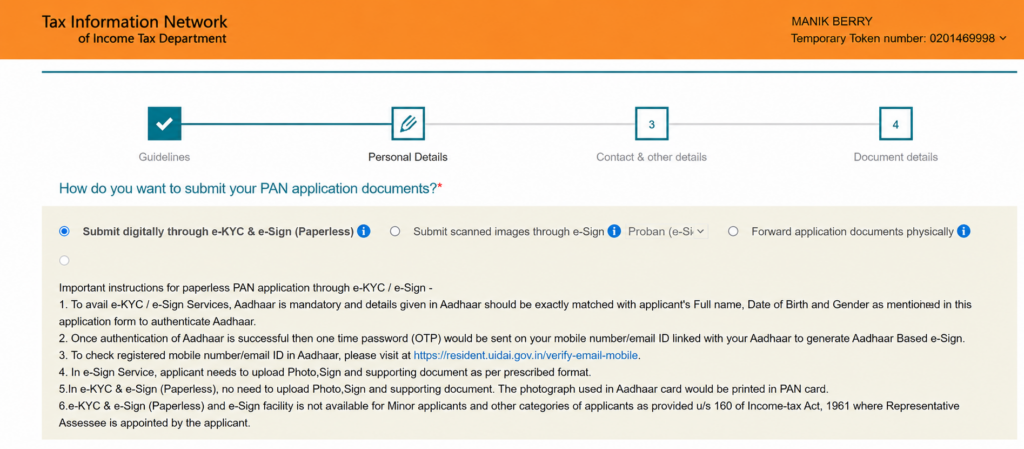
After choosing Submit digitally through e-KYC & e-Sign (Paperless), you’ll need to complete your personal information and verify your identity.
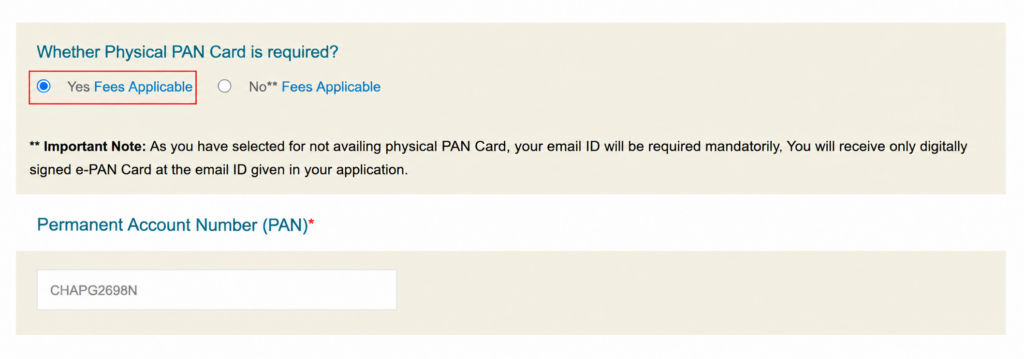
4.1 Choose Whether You Need a Physical PAN Card
First, decide whether you want a physical PAN card along with your e-PAN.
- Select “Yes (Fees Applicable)” if you want a printed PAN card delivered to your registered address.
- Select “No (Fees Applicable)” if you only need a digitally signed e-PAN sent to your registered email address.
Next, enter your existing PAN Number in the required field.
Tip: If you’re unsure, choose “Yes (Fees Applicable)” to receive both a physical PAN card and an e-PAN.
4.2 Verify Your Aadhaar Details
To continue with the paperless application, you’ll need to verify your Aadhaar details.
- Make sure the “Aadhaar Number (Only for Individual)” option is selected.
- Enter the last four digits of your Aadhaar number.
- In the “Name As Per Aadhaar” field, enter your name exactly as it appears on your Aadhaar card.
Important: The name entered here should match your Aadhaar records. Any mismatch may delay the verification process or result in your application being rejected.
4.3 Enter Your Updated Personal Information
Now, provide the personal details that you want to appear on your updated PAN card.
Fill in the following information:
- Select your Title (Mr., Mrs., Ms., Shri, etc.).
- Enter your First Name, Middle Name (if applicable), and Last Name/Surname.
- In the “Name that you would like printed on PAN Card” field, enter your updated name exactly as you want it to appear on your new PAN card.
- Verify your Date of Birth and select your Gender.
Note: Make sure your updated name matches your supporting documents, such as your Aadhaar card, marriage certificate, divorce decree, gazette notification, or other valid proof of name change.
4.4 Enter Your Parent’s Details
Next, provide your parent’s details as required on the application form.
- Enter your Father’s First Name, Middle Name (if applicable), and Last Name.
- If required, you can also enter your Mother’s Name in the optional fields.
- Under “Parent’s Name to be Printed on the PAN Card,” choose whether you want your Father’s Name or Mother’s Name to appear on your PAN card.
Note: In most cases, applicants choose Father’s Name. However, if you’re eligible to use only your mother’s name, you can select that option.
4.5 Review and Continue
Carefully review all the information you’ve entered to ensure there are no spelling mistakes or incorrect details.
Once everything is correct, click “Next” to proceed to the Contact & Other Details section of your PAN name change application.
Step 5:- Enter Your Contact and Address Details
After completing your personal information, you’ll be taken to the Contact & Other Details section. Here, you’ll need to provide your communication address and contact information.
Select Your Communication Address
Under “Address for Communication,” choose the address where you want to receive your physical PAN card (if you’ve opted for one).
- Select Residence if you want your PAN card delivered to your home address.
- Select Office if you prefer to receive it at your office address.
Note: If you’re applying through e-KYC & e-Sign (Paperless), your address is automatically fetched from your Aadhaar record. Make sure your Aadhaar address is correct before proceeding.
Enter Your Address Details
Next, fill in the required address fields carefully:
- Flat / Room / Door / Block No.
- Name of Premises / Building / Village
- Road / Street / Lane / Post Office
- Area / Locality / Taluka / Sub-Division
- Town / City / District
- Country
- State / Union Territory
- PIN Code
- ZIP Code (if applicable for foreign addresses)
Provide Your Contact Information
After entering your address, provide the following contact details:
- Email ID
- Mobile Number
- Country Code (ISD Code), if required
Important: Double-check your address, email ID, and mobile number before moving to the next step. These details will be used for communication, OTP verification, and PAN card delivery (if applicable).
- Keep the “Telephone Number & Email ID Details” checkbox selected (as shown on the screen). This allows you to provide or update your mobile number and email address, which are required for OTP verification, application status updates, and other important communications related to your PAN name change request.
Recommended: Leave the “Telephone Number & Email ID Details” checkbox checked to ensure you receive application updates and verification messages without any issues.
Step 6: Select the Required Document Proofs
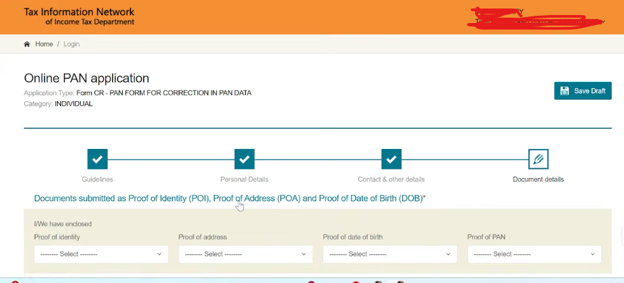
After clicking “Next,” you’ll reach the Document Details page. Here, select the required document proofs from each dropdown menu.
Choose the following options:
- Proof of Identity (POI): Select “AADHAAR Card issued by the Unique Identification Authority of India (UIDAI)”.
- Proof of Address (POA): Select “AADHAAR Card issued by the Unique Identification Authority of India (UIDAI)”.
- Proof of Date of Birth (DOB): Select “AADHAAR Card issued by the Unique Identification Authority of India (UIDAI)”.
- Proof of PAN: Select “No Document”.
These are the recommended selections if you’re applying through the e-KYC & e-Sign (Paperless) method using your Aadhaar.
Important: The Aadhaar details you provide must match your PAN records. If you’re changing your name after marriage, divorce, or another legal name change, you’ll also be asked to upload the appropriate supporting document (such as a Marriage Certificate, Divorce Decree, or Gazette Notification) in the next step.
After selecting the required document proofs, click “Next” to continue with the document upload process.
Step 6: Select Documents, Complete the Declaration & Upload Supporting Documents
After completing the Contact & Other Details section, click “Next” to open the Document Details page. Here, you’ll need to select the required document proofs, complete the declaration, and upload all the necessary files.
Select the Required Document Proofs
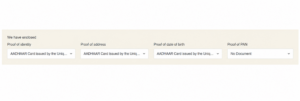
Choose the following options from each dropdown menu:
- Proof of Identity (POI): AADHAAR Card issued by the Unique Identification Authority of India (UIDAI)
- Proof of Address (POA): AADHAAR Card issued by the Unique Identification Authority of India (UIDAI)
- Proof of Date of Birth (DOB): AADHAAR Card issued by the Unique Identification Authority of India (UIDAI)
- Proof of PAN: No Document
Note: These selections are applicable when you’re applying through the e-KYC & e-Sign (Paperless) method.
Complete the Declaration
Scroll down to the Declaration section and enter the required details.
- Under “Capacity of the Applicant,” select “Himself/Herself” if you’re applying for your own PAN card.
- Enter the total number of supporting documents you’re uploading.
- Enter your Place (your current city or town).
- Verify the Date, which is usually filled automatically by the portal.
After filling in the declaration, continue to the document upload section.
Upload Your Photograph and Signature
Next, upload your recent passport-size photograph and signature.
Before uploading, make sure:
- Your photograph is clear and recent.
- Your signature is clear and readable.
- Both the photograph and signature files must be less than 50 KB each.
Tip: If your files are larger than 50 KB, compress or resize them before uploading to avoid upload errors.
Upload Your Supporting Documents
Now, upload all the supporting documents required for your PAN name change application.
Click “Add Document”, select the required document from your device, and then click “Upload.” Repeat the same process until you’ve uploaded all the required documents.
If you’re changing your name after marriage, divorce, or any other legal name change, you may need to upload documents such as:
- Aadhaar Card
- Marriage Certificate
- Divorce Decree
- Gazette Notification
- Passport or any other accepted supporting document (if applicable)
Important: All supporting documents must be uploaded in PDF format, and each PDF file must be less than 300 KB. Files larger than the permitted size may not be accepted by the portal.
Review and Submit Your Application
Before submitting your application, carefully review all the details you’ve entered and ensure that every uploaded document is correct and clearly visible.
Once you’re satisfied that everything is accurate, click “Submit” to proceed to the payment page. After completing the payment, verify your Aadhaar through e-KYC & e-Sign to successfully submit your PAN name change application.
Important: Double-check your uploaded photograph, signature, and supporting documents before submission. Incorrect, blurred, or oversized files are one of the most common reasons for delays or rejection of PAN correction applications.
Step 7: Pay the Application Fee
After reviewing your application and uploading all the required documents, you’ll be redirected to the payment page.
To continue with your PAN name change application, pay the applicable processing fee.
- Application Fee: ₹96 (₹85 application fee + applicable taxes).
- Choose your preferred payment method, such as Debit Card, Credit Card, Net Banking, UPI, or other available online payment options.
- Complete the payment and wait for the transaction confirmation.
Note: The application will only be processed after the payment is successfully completed. If the payment fails, you may need to retry the transaction before proceeding.
Once your payment is successful, you’ll be redirected to the Aadhaar e-KYC & e-Sign verification page to complete your PAN name change application.
The Offline Method to Change Surname in PAN Card
If you are not comfortable with the online process, you can opt for the offline method.
- Download the Form: Download the ‘Request for New PAN Card Or/And Changes Or Correction in PAN Data’ form from the NSDL or UTIITSL website.
- Fill the Form: Print the form and fill it out in block letters using a black pen. Tick the box corresponding to your name to indicate a correction.
- Attach Documents: Attach two recent passport-sized photographs in the designated spaces. Sign across one of the photos. Also, attach self-attested copies of all the required documents (POI, POA, PODB, Proof of PAN, and Proof of Name Change).
- Submit and Pay: Find your nearest PAN Centre or TIN-Facilitation Center. Submit the completed form along with the documents and pay the processing fee in cash or by demand draft.
- Collect Acknowledgement: The officer will provide you with a stamped acknowledgement slip, which you should keep safe for tracking purposes.
Fees and Processing Time
The fee for a PAN card name change is standard across all methods.
| Communication Address | Fee (Inclusive of Taxes) |
| Within India | Approximately ₹101 – ₹110 |
| Outside India | Approximately ₹1011 – ₹1020 |
Once your application is successfully submitted and verified, it typically takes about 15-20 working days for the updated PAN card to be dispatched to your registered address.
Conclusion
Whether you choose the online or offline route, the process to change name on PAN card is well-defined and manageable. The key to a hassle-free experience is ensuring you have the correct supporting documents, especially the legal proof of your name change like a marriage certificate or gazette notification. By following the steps outlined in this guide, you can successfully update your PAN details and maintain a consistent financial identity for all your future transactions.
